Implementing a CLR Stored Procedure in a LINQ based n-tier architecture
This article is a sequel to my previous article on "CLR Stored Procedure and creating it step by step." In the prior piece, I delved into CLR Stored Procedures, elucidating their benefits and drawbacks, and providing a guide on their implementation. CLR Stored Procedures prove formidable, yielding superior results when executing intricate logic, intense string operations or manipulations, cryptography, accessing system resources, and file management, among other functions.
The development of any project within an n-tier architecture imparts a unique flavor, accompanied by its own set of advantages and disadvantages. Microsoft introduced LINQ, or Language Integrated Query, with .NET Framework 3.0. LINQ offers diverse implementation options such as LINQ with SQL, LINQ with Objects, LINQ with DataSet, and LINQ with XML. A few years ago, I implemented a straightforward n-tier architecture in my company that suited both web and desktop applications. This centralized n-tier architecture consolidated all objects within the same location in the target system.
While I do not assert it as the ultimate solution, I implemented this architecture to attain the following benefits:
- Security, ease of implementation, and straightforward deployment.
- A tier-based structure, at least three-tiered, facilitating deployment of only the DLL corresponding to the altered tier's code.
- A unified architecture for web and desktop applications with standard application performance.
- Facilitation of parallel development, allowing different developers to work on the database, business logic, user interface, etc.
- Exclusion of in-line SQL queries.
- Non-complexity to enable new developers to easily embark on development without extensive training, and seamless migration of existing developers between projects due to the uniform basic development architecture across all projects.
Defining Tiers for the Application:
Now, let's delve into the various tiers of the architecture. A robust architecture typically comprises three vital tiers:
- User Interface or Presentation Layer
- Business Logic Layer
- Data Layer
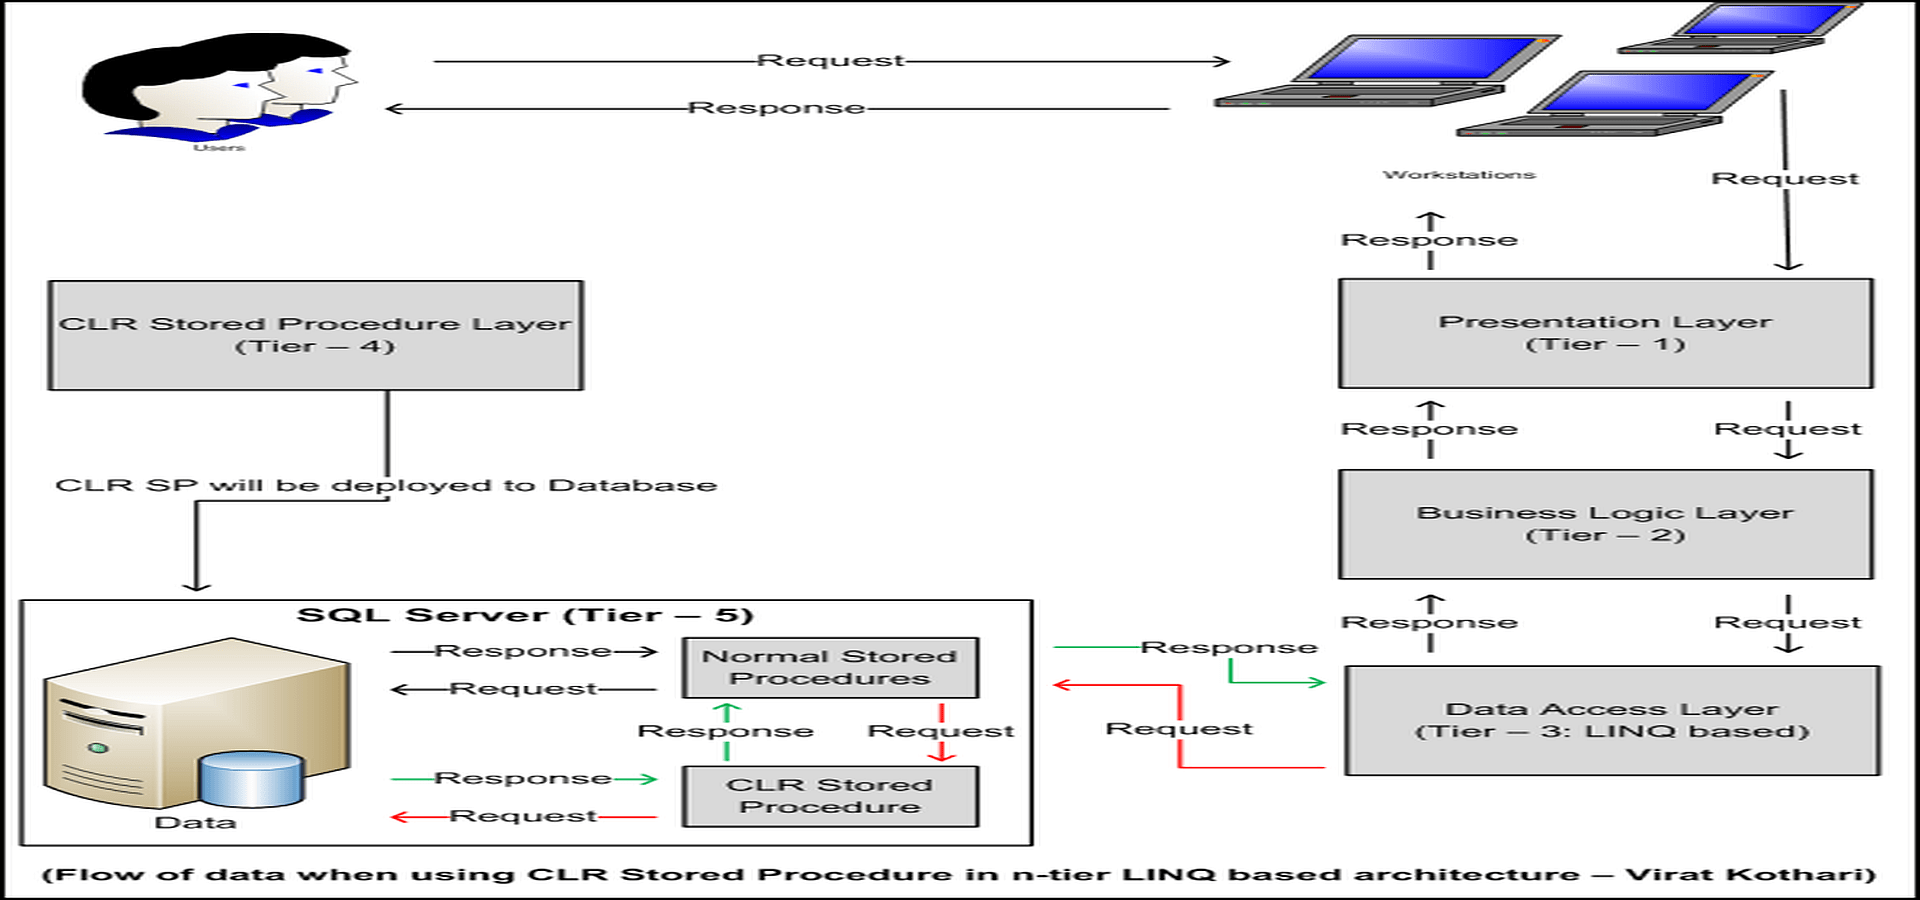
The architecture I am elucidating encompasses five tiers. Any architecture featuring more than three tiers is labeled an n-tier architecture. The image below illustrates the architecture in our application, comprising four tiers (refer to the image) and a database, totaling five tiers.
Roles of Tiers
Allow me to provide a brief explanation of each tier mentioned above:
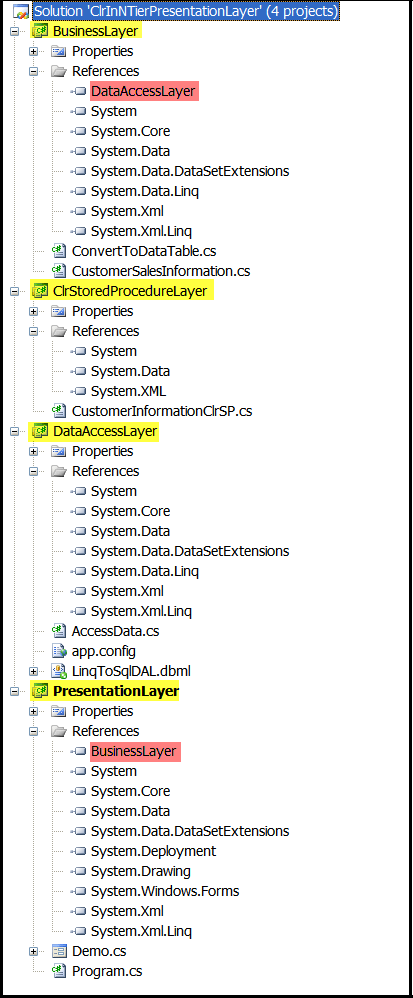
Tier – 1: Presentation Layer This layer manages various activities between users and the application. All user interface-related logic is housed in this tier, encompassing web forms or WinForms. The Presentation Layer lacks direct access to the database or Data Access Layer; therefore, all data entering or leaving this layer does so through the Business Logic Layer exclusively. A reference to the Business Logic Layer is added to this tier, and a separate project is dedicated to it.
Tier – 2: Business Logic Layer The Business Logic Layer executes all application business logic, comprising both core business logic and data access logic. The data access logic is isolated into a distinct layer to enhance security and data encapsulation. Each table in the database corresponds to a separate class in this layer, streamlining management. This class incorporates various methods, and the business logic is applied to data moving between the Presentation Layer and Data Access Layer. A reference to the Data Access Layer is included in this tier, and a separate project is allocated for it.
Tier – 3: Data Access Layer This layer, while part of the business logic, remains separate from the core business logic. It handles all data-related operations between the application and the database, utilizing LINQ. A LINQ to SQL class is created in this layer, where necessary database tables or Stored Procedures are dragged and dropped. Manual coding in this layer is minimized. A separate project is designated for the Data Access Layer.
Tier – 4: CLR Stored Procedure Layer This layer defines various CLR Stored Procedures and features a separate class for each database table, enhancing manageability. It is not directly associated with the Presentation Layer, Business Logic Layer, or Data Access Layer. CLR Stored Procedures are deployed to the SQL server, and a distinct project is dedicated to this layer. For detailed information on CLR Stored Procedures and their creation, refer to my article "CLR Stored Procedure and Creating it Step by Step."
Tier – 5: Database This tier constitutes the core data and objects for maintenance and access, such as a SQL Server database. Core data encompasses information in various tables, while objects for maintenance and access include tables, Stored Procedures, CLR Stored Procedures, Views, and Functions. Physically, there are five layers, but logically, they amount to four layers, as the CLR Stored Procedure assembly becomes part of the database during deployment.
Adding a reference from one project to another is a simple process. Right-click on the project, select "Add Reference," and a dialog box will appear. Choose the "Projects" tab, select the relevant project from the list, and click "OK." Circular references within a project, like the Presentation Layer referencing the Business Layer and the Business Layer referencing the Data Access Layer, are avoided to prevent complications.
Implementing a CLR Stored Procedure in a LINQ-based n-tier architecture step by step
Let's implement a CLR Stored Procedure in a LINQ-based n-tier architecture. The attached script to this article includes all SQL statements for creating a database, tables, inserting dummy records, etc.
Application development specifications:
- IDE: Visual Studio 2008
- .NET Framework: 3.5 with SP 1
- Language: C# 3.0
- Database: Microsoft SQL Server 2005 Express edition
- Operating System: Windows XP with SP 2
Steps to create the architecture:
Creating the Presentation Layer:
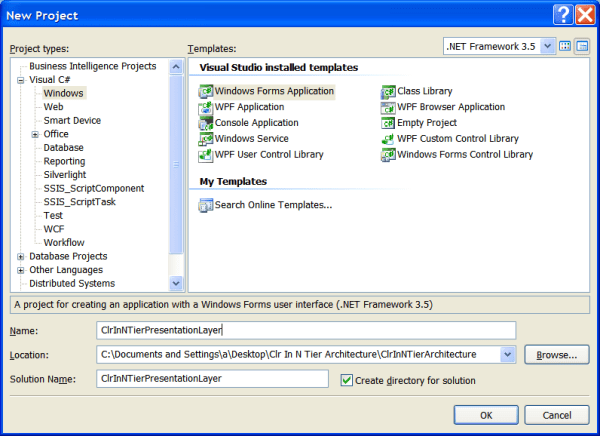
- Open Microsoft Visual Studio 2008
- Create a new project, by selecting Visual C# >> Windows.
- Choose "Windows Forms Application" as the template.
- Provide a proper name for the project and solution and select a location to save the solution. This project serves as our presentation layer. Refer to the attached image for clarity.
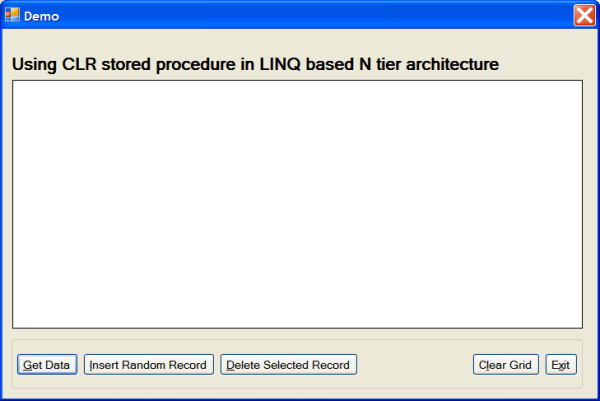
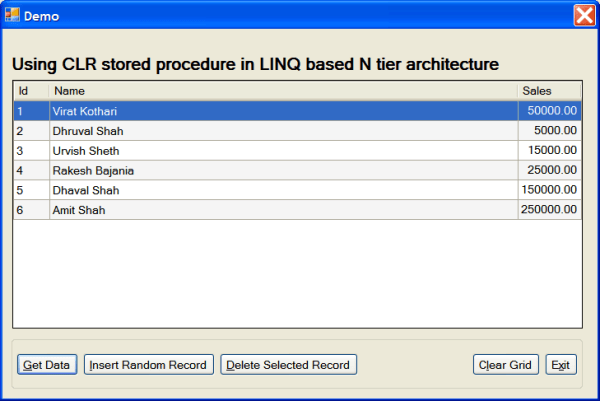
A default form named "Form1" will be generated with the project. Rename it to "Demo" and design it as depicted in the following image. The design includes a Label control for the heading, a DataGridView control, and a GroupBox control to house various buttons, namely, Get Data, Insert Random Record, Delete Selected Record, Clear Grid, and Exit. Refer to the image below for a clearer understanding.
Following is the code for the demo form: Hide Shrink ![]() Copy Code
Copy Code
using System;
using System.Windows.Forms;
using BusinessLayer;namespace ClrInNTierPresentationLayer
{
/// <summary>
/// Represents demo form for the application
/// </summary>
public partial class frmDemo : Form
{
#region Constructor/// <summary>
/// Constructor of the application
/// </summary>
public frmDemo()
{
InitializeComponent();
}#endregion
#region Event Handler
#region Buttons
/// <summary>
/// Handles Click event of the button
/// </summary>
/// <param name="sender"></param>
/// <param name="e"></param>
private void btnGetData_Click(object sender, EventArgs e)
{
try
{
FillDataGridView();
}
catch (Exception ex)
{
MessageBox.Show(ex.Message, "Error",
MessageBoxButtons.OK, MessageBoxIcon.Error);
}
}/// <summary>
/// Handles Click event of the button
/// </summary>
/// <param name="sender"></param>
/// <param name="e"></param>
private void btnInsertRandomRecord_Click(object sender, EventArgs e)
{
try
{
CustomerSalesInformation.CustomerSalesInformationInsertRandomRecord();
FillDataGridView();
}
catch (Exception ex)
{
MessageBox.Show(ex.Message, "Error",
MessageBoxButtons.OK, MessageBoxIcon.Error);
}
}/// <summary>
/// Deletes selected record from the database
/// </summary>
/// <param name="sender"></param>
/// <param name="e"></param>
private void btnDeleteSelectedRecord_Click(object sender, EventArgs e)
{
try
{
if (dgvData.Rows.Count > 0)
{
if (MessageBox.Show(
"Are you sure to delete selected record?",
"Confirmation", MessageBoxButtons.YesNo,
MessageBoxIcon.Question) == DialogResult.Yes)
{
CustomerSalesInformation.CustomerSalesInformationDelete(
Convert.ToDouble(
dgvData.CurrentRow.Cells["ID"].Value.ToString()));
FillDataGridView();
}
}
}
catch (Exception ex)
{
MessageBox.Show(ex.Message, "Error",
MessageBoxButtons.OK, MessageBoxIcon.Error);
}
}/// <summary>
/// Handles Click event of the button
/// </summary>
/// <param name="sender"></param>
/// <param name="e"></param>
private void btnClearGrid_Click(object sender, EventArgs e)
{
try
{
dgvData.DataSource = null;
}
catch (Exception ex)
{
MessageBox.Show(ex.Message, "Error",
MessageBoxButtons.OK, MessageBoxIcon.Error);
}
}/// <summary>
/// Handles Click event of the button
/// </summary>
/// <param name="sender"></param>
/// <param name="e"></param>
private void btnExit_Click(object sender, EventArgs e)
{
try
{
Application.Exit();
}
catch (Exception ex)
{
MessageBox.Show(ex.Message, "Error",
MessageBoxButtons.OK, MessageBoxIcon.Error);
}
}#endregion
#endregion
#region Private Methods
/// <summary>
/// Fills the data in the DataGridView
/// </summary>
private void FillDataGridView()
{
try
{
//Filling the grid with data
dgvData.DataSource =
CustomerSalesInformation.CustomerSalesInformationGet();//Formating the columns of the grid
dgvData.Columns[0].AutoSizeMode =
DataGridViewAutoSizeColumnMode.AllCells;
dgvData.Columns[1].AutoSizeMode =
DataGridViewAutoSizeColumnMode.Fill;
dgvData.Columns[2].AutoSizeMode =
DataGridViewAutoSizeColumnMode.AllCells;dgvData.Columns[2].DefaultCellStyle.Alignment =
DataGridViewContentAlignment.TopRight;
}
catch (Exception ex)
{
MessageBox.Show(ex.Message, "Error",
MessageBoxButtons.OK, MessageBoxIcon.Error);
}
}#endregion
}
}
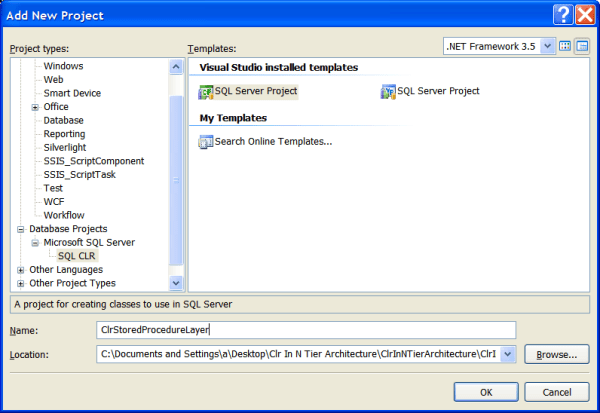
2. Creating the CLR Stored Procedure Layer: Right-click on the Solution, select Add >> New Project. A dialog box will open. Choose Database Projects >> Microsoft SQL Server >> SQL CLR from the left-side “Project Types” panel. Select “SQL Server Project” on the right-side “Templates” panel. Provide a suitable name for the project and select the location to save this solution. This project will serve as our CLR Stored Procedure Layer. Follow the steps outlined in my article “CLR Stored Procedure and Creating It Step by Step” to add a CLR Stored Procedure to this project. Refer to the attached image for clarity.
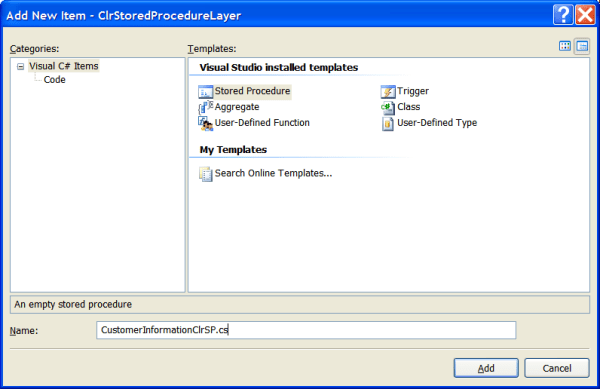
Right-click on the project, then select Add >> Add New Items. A dialog box will appear, as shown in the following image. Choose Visual C# Items from the left-side "Categories" panel, and select Stored Procedure from the right-side "Templates" panel. Provide an appropriate name for it.
Following is the code for the CustomerInformationClrSP class: Hide Shrink ![]() Copy Code
Copy Code
using System;
using System.Data.SqlClient;
using Microsoft.SqlServer.Server;/// <summary>
/// Represents the CustomerInformationClrSP
// module for the CLR Stored Procedure Layer
/// </summary>
public partial class CustomerInformationClrSP
{
#region Pubic Methods/// <summary>
/// Gets data from Customers Sales Information table
/// </summary>
[Microsoft.SqlServer.Server.SqlProcedure]
public static void CustomerSalesInformationGet()
{
#region Variable DeclarationSqlConnection sqlConnection = new SqlConnection();
SqlCommand sqlCommand = new SqlCommand();#endregion
try
{
// Establishing connection with SQL
sqlConnection = new SqlConnection("context connection=true");
sqlConnection.Open();
//Creating command
sqlCommand = new SqlCommand("SELECT * FROM CustomerSalesInformation",
sqlConnection);
//Executing command
SqlContext.Pipe.ExecuteAndSend(sqlCommand);
}
catch (Exception)
{
throw;
}
finally
{
sqlConnection.Close();
sqlConnection.Dispose();
sqlCommand.Dispose();
}
}/// <summary>
/// Inserts random Customer Record in to the Customers Sales Information table
/// </summary>
[Microsoft.SqlServer.Server.SqlProcedure]
public static void CustomerSalesInformationInsertRandomRecord()
{
#region Variable DeclarationSqlConnection sqlConnection = new SqlConnection();
SqlCommand sqlCommand = new SqlCommand();#endregion
try
{
// Establishing connection with SQL
sqlConnection = new SqlConnection("context connection=true");
sqlConnection.Open();//Creating command: Inserting new name of random customer based on GUID
sqlCommand = new SqlCommand("INSERT INTO [dbo].[CustomerSalesInformation]" +
"([Name], [Sales]) VALUES ('" + Guid.NewGuid().ToString() +
"', 50000)", sqlConnection);//Executing command
SqlContext.Pipe.ExecuteAndSend(sqlCommand);
}
catch (Exception)
{
throw;
}
finally
{
sqlConnection.Close();
sqlConnection.Dispose();
sqlCommand.Dispose();
}
}/// <summary>
/// Deletes record from CustomerSalesInformation table for the supplied ID
/// </summary>
/// <param name="CustomerId">Customer ID for which
/// record is to be deleted</param>
[Microsoft.SqlServer.Server.SqlProcedure]
public static void CustomerSalesInformationDelete(double CustomerId)
{
#region Variable DeclarationSqlConnection sqlConnection = new SqlConnection();
SqlCommand sqlCommand = new SqlCommand();#endregion
try
{
// Establishing connection with SQL
sqlConnection = new SqlConnection("context connection=true");
sqlConnection.Open();//Creating command: Deleting record for the customer ID
sqlCommand = new SqlCommand("DELETE FROM [DbForClrDemo]." +
"[dbo].[CustomerSalesInformation] WHERE ID = " +
CustomerId, sqlConnection);//Executing command
SqlContext.Pipe.ExecuteAndSend(sqlCommand);
}
catch (Exception)
{
throw;
}
finally
{
sqlConnection.Close();
sqlConnection.Dispose();
sqlCommand.Dispose();
}
}#endregion
};
3. Creating the Business Layer:
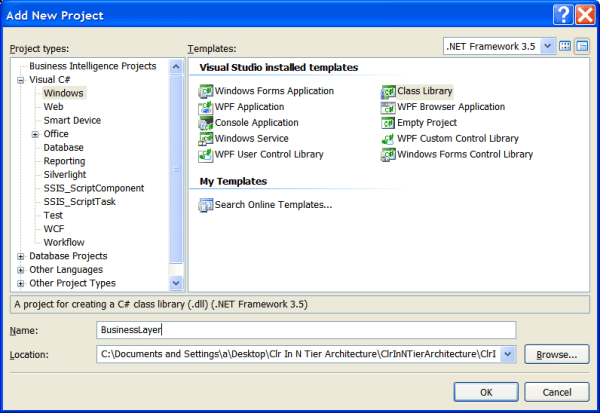
Right-click on the Solution, select Add >> New Project. A dialog box will appear. Choose Visual C# >> Windows from the left side "Project Types" panel. Select "Class Library" from the right side "Templates" panel. Provide a proper name for the project and select a location to save this solution. This project will serve as our Business Logic Layer. I have included two classes in this project:
- ConvertToDataTable
- CustomerSalesInformation
The ConvertToDataTable class encompasses various methods to convert an array of objects to a DataTable or DataSet. The CustomerSalesInformation class includes various methods for inserting a record, deleting a record, and retrieving records from the database. Refer to the attached image for clarification.
Following is the code for the CustomerSalesInformation class of the Business Layer. Hide Shrink ![]() Copy Code
Copy Code
using System;
using System.Data;
using System.Linq;
using DataAccessLayer;namespace BusinessLayer
{
/// <summary>
/// Represents the ExecuteClr module for the Business Layer
/// </summary>
public class CustomerSalesInformation
{
#region Public Methods/// <summary>
/// Gets records from Customer Sales Information table
/// </summary>
/// <returns>Datatable</returns>
public static DataTable CustomerSalesInformationGet()
{
try
{
object[] objData =
AccessData.Call.CustomerSalesInformationGet().
ToArray<CustomerSalesInformationGetResult>();
return ConvertToDataTable.ConvertToDatatable(objData);
}
catch (Exception)
{
throw;
}
}/// <summary>
/// Inserts random customer in to Customer Sales Information table
/// </summary>
public static void CustomerSalesInformationInsertRandomRecord()
{
try
{
AccessData.Call.CustomerSalesInformationInsertRandomRecord();
}
catch (Exception)
{
throw;
}
}/// <summary>
/// Deletes record for the supplied customer id
/// </summary>
/// <param name="CustomerID">Customer ID for which
/// record is to be deleted</param>
public static void CustomerSalesInformationDelete(double CustomerID)
{
try
{
AccessData.Call.CustomerSalesInformationDelete(CustomerID);
}
catch (Exception)
{
throw;
}
}#endregion
}
}
4. Creating the Data Access Layer: Once again, right-click on the Solution, select Add >> New Project. A dialog box will open. Choose Visual C# >> Windows in the left-side "Project Types" panel. Opt for "Class Library" in the right-side "Templates" panel (same as in step 3). Provide a suitable name for the project and select a location to save this solution. This project will serve as our Data Access Layer.
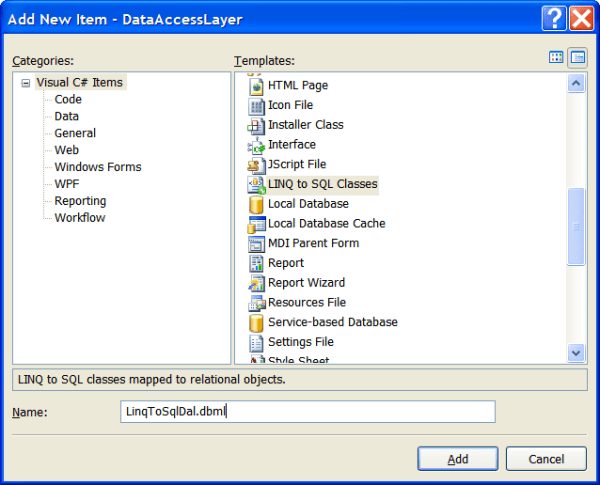
Next, right-click on the "DataAccessLayer" project, and select the Add >> New Item option from the menu. The dialog box depicted in the following image will appear. Choose Visual C# Items in the left-side "Categories" panel and "LINQ to SQL Classes" in the right-side panel "Templates."
5. Adding a Stored Procedure to the DBML File:
To incorporate a Stored Procedure into the DBML file, open Server Explorer and click on the "Connect to database" button located at the top-middle of the Server Explorer window. This action initiates a new wizard for connecting to the database. Subsequently, drag and drop the Stored Procedures "CustomerSalesInformationDelete" and "CustomerSalesInformationInsertRandomRecord." Avoid dragging and dropping "CustomerSalesInformationGet" at this point, as modifications are required. I have introduced the AccessData class to include various useful methods and variables for application in the Business Logic Layer. Currently, I have declared a private object of LinqToSqlDataContext and exposed it using the Call property. Refer to the following image for clarity. Make sure to alter the connection string that I have statically written during the declaration of the LinqToSqlDataContext object.

Using the Code
- Download the Zip files for the source code and the SQL script, and extract them.
- Create the database and tables using "Script to Create Database and Table.sql." SQL statements to insert dummy records are also included in the same file.
- Configure the connection of the application with your database. Make changes in the connection at two places in the application, as explained in Step 8.
- Run the demo. It should now run without problems.
- When you hit the "Get Data" button for the first time, it will take a little time to fetch data from the database. Now, hit the "Clear Grid" button and then the "Get Data" button once again, and you will notice the increased speed. Additionally, try hitting the "Insert Random Record" button continuously for multiple times. It inserts a record into the database and fills the grid with every hit; observe the speed of this process.
- Please note that the web application might exhibit slightly slower performance compared to the Windows application.
Conclusion
CLR Stored Procedures can be efficiently implemented in n-tier architectures.
Suggestion
Refer to my other article, "CLR Stored Procedure and Creating It Step by Step.